1 – 1 Domain Server (DC1)
2 – 1 Member Server (this server will be upgraded to Domain Controller)
1st – Install domain controller in member server
2nd – Rename the default site
1- Log in to DC01 domain server and open Active Directory Sites and Services…
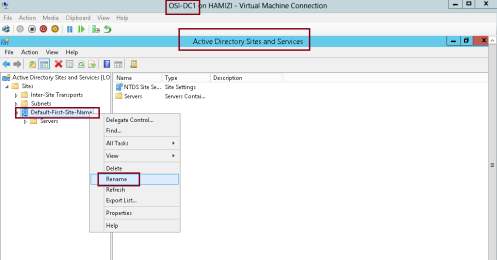
2 – Next, In Active Directory Sites and Services console, right-click Default-First-Site-Name, and then click Rename…
3 – I rename the Default-First-Site-Name to JakartaHQ, and then verify that both LON-DC1 and TOR-DC1
belong to the JakartaHQ site.
belong to the JakartaHQ site.
3rd – Configure IP subnets associated with the default site
1 – to Configure IP subnets, right-click Subnets, and then click New Subnet…
2 – In the New Object – Subnet dialog box, under Prefix, type 172.16.0.0/24, then click JakartaHQ, and then click OK…
4th – Create the AD DS sites
1 – In the Active Directory Sites and Services console, right-click Sites, and then click New Site…
2 – In the New Object – Site dialog box, type Toronto then click DEFAULTIPSITELINK, and then click OK…
3 – click OK…
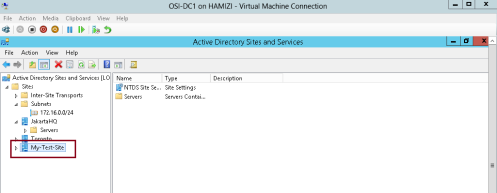
4 – repeat the previous step, but this time give a name as My-Test-Site…
5th – Create IP subnets associated with the Toronto sites
1 – In the Active Directory Sites and Services console, right-click Subnets, and then click New Subnet…
2 – In the New Object – Subnet dialog box, under Prefix, type 172.16.1.0/24, click Toronto, and then click OK…
3 – Right-click Subnets again, and then click New Subnet, under Prefix, type 172.16.100.0/24, then Under Select a site object for this prefix, click My-Test-Site, and then click OK…
4 – Verify in the details pane that the two subnets are created and associated with their appropriate site…
6th – Configure site-links between ADDS sites
1 – In the Active Directory Sites and Services console, right-click IP, and then click New Site Link…
2 – In the New Object – Site Link box, type Toronto-Test-Site, then click Toronto and My-Test-Site, click Add…

3 – Then click OK…
4 – Right-click Toronto-Test-Site, and then click Properties…
5 – then click Change Schedule…
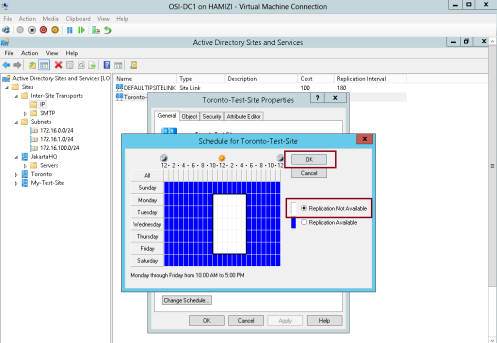
6 – In the Schedule for Toronto-Test-Site box, highlight any range you prefer and then click Replication Not Available, and click OK…
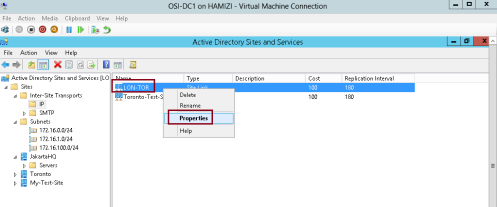
7 – Next rename the DEFAULTIPSITELINK to LON-TOR…
8 – Next right-click LON-TOR, and then click Properties…
9 – Under Sites in this site link, click My-Test-Site, and then click Remove…
10 – Next to Replicate Every, change the value to 30 minutes, and then click OK…
7th – Move 2nd DC to the Toronto site
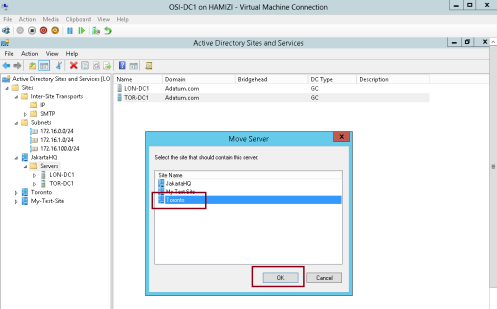
1 – In Active Directory Sites and Services console, right-click TOR-DC1, and then click Move…
2 – In the Move Server box, click Toronto, and then click OK…
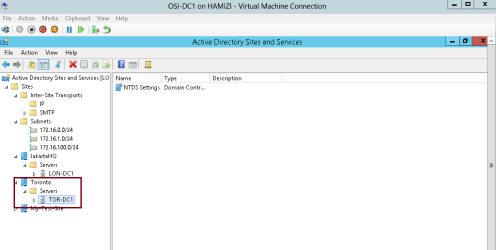
3 – Verify the TOR-DC1 listed under Toronto site…
8th – Monitor ADDS site replication
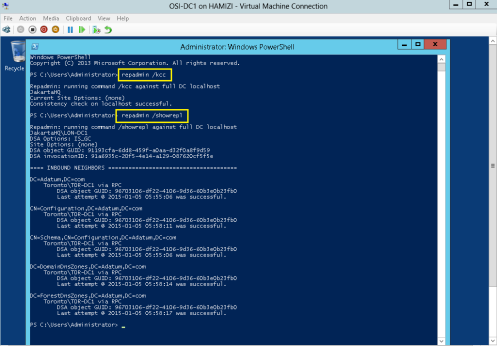
1 – On the DC01, open Windows PowerShell and then type Repadmin /kcc
** This command recalculates the inbound replication topology for the server.
** Knowledge Consistency Checker (KCC) helps generate and optimize the replication automatically between domain controllers within a site.
** type Repadmin /showrepl
— To display the replication connections of a domain controller and make sure you verify that the last replication with TOR-DC1 was successful…
2 – Next, type Repadmin /bridgeheads
** This command displays the bridgehead servers for the site topology…
then type : Repadmin /replsummary
** This command displays a summary of replication tasks. Verify that no errors appear…
3 – Next, type DCDiag /test:replications
** Verify that all connectivity and replication tests pass successfully…
4 – Switch to the other Domain controller , and then repeat the same steps and that the last replication with LON-DC1 was successful.










No comments:
Post a Comment